

OS - Lab 7: File System and Shell
目录
Operating Systems (H) @ Fudan University, fall 2020.
1 实验简介
2 实验报告
2.1 文件系统
实验目标
请实现文件系统,本实验中的文件系统遵循 xv6 的设计,你也可以从 0 开始设计属于你的文件系统。如果你的文件系统不同于 xv6 的话,请修改 user/src/mkfs。你需要添加测试证明你实现的文件系统可以读取到你打包的文件,在数量、内容上是正确的。
2.1.0 总览
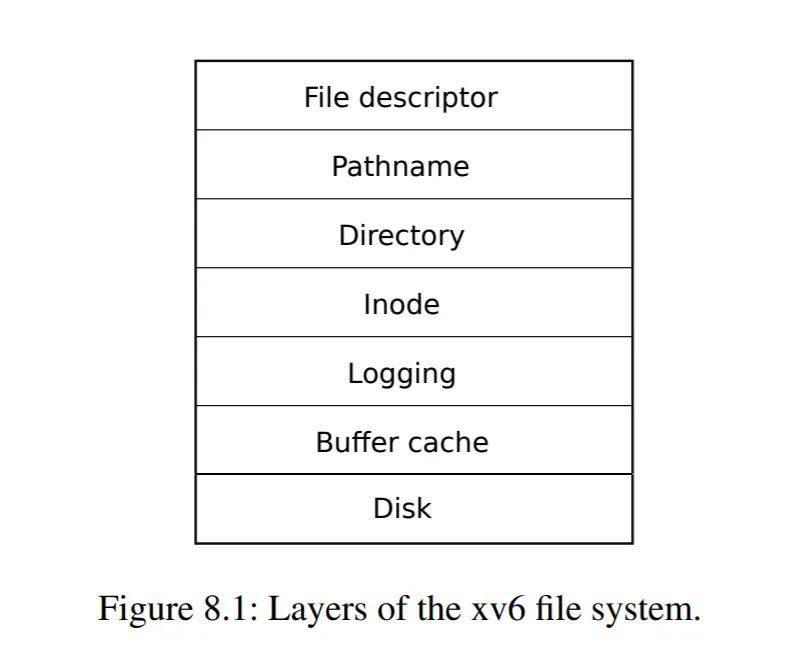
文件系统的整体架构参考 xv6 的设计,其 7 层架构如图所示。以下我们将自底向上依次进行阐述。
2.1.1 Disk
第 1 层是磁盘驱动,作为物理磁盘的抽象层,为操作系统提供了读写磁盘块的方法。我们已在 Lab 6 时在 kern/sd.c 中实现,详见 Lab 6:块设备驱动。
在这一层中,我们提供了以下方法:
sd_init:初始化 SD 卡并解析主引导记录sd_intr:处理 SD 卡设备中断sd_rw:读写 SD 卡磁盘块
2.1.2 Buffer cache
第 2 层是磁盘块缓存,用于将磁盘块缓存到内存中,从而加速磁盘读写。我们已在 Lab 6 时在 kern/bio.c 中实现,详见 Lab 6:I/O 框架。
在这一层中,我们提供了以下方法:
binit:初始化buf队列bcachebread:从磁盘读取buf到内存bwrite:将buf从内存写入磁盘brelse:释放一个不在使用中的bufbpin:将buf的引用数加1,其中引用数表示当前正在等待此buf的设备数量bunpin:将buf的引用数减1
2.1.3 Logging
第 3 层是磁盘改动日志,用于维护文件系统的崩溃一致性(crash consistency),确保写磁盘的事务是原子(atomic)的。我们将在 kern/log.c 中实现。
在这一层中,我们提供了以下方法:
initlog:初始化loglog_write:作为bwrite的代理,在log中记录需要被写入磁盘的 block 的标号,并标记为 dirty,之后统一写入begin_op:开始文件系统调用end_op:结束文件系统调用
2.1.3.1 initlog
函数 initlog 的主要工作是根据 super block 中的信息对 log 进行初始化,然后调用函数 recover_from_log,根据 log header 恢复崩溃前未写入到磁盘的数据。kern/log.c
1
2
3
4
5
6
7
8
9
10
11
12
13
14
15
void
其中,super block 保存了磁盘的布局信息,详见注释:inc/fs.h
1
2
3
4
5
6
7
8
9
10
11
12
13
14
15
16
/*
* Disk layout:
* [boot block | super block | log | inode blocks | free bit map | data blocks]
*
* mkfs computes the super block and builds an initial file system.
* The super block describes the disk layout:
*/
;
我们先调用函数 readsb 读取 super block。kern/fs.c
1
2
3
4
5
6
7
8
9
10
/*
* Read the super block.
*/
void
然后我们利用 super block 中的信息初始化 log,其中 log 的结构如下所示:kern/log.c
1
2
3
4
5
6
7
8
9
10
11
12
13
14
15
16
17
18
/*
* Contents of the header block, used for both the on-disk header block
* and to keep track in memory of logged block # before commit.
*/
;
log;
这里 log header 保存的是已 commit 的 block 的标号。
log 初始化完毕后,我们调用函数 recover_from_log 进行磁盘的恢复工作,以维护磁盘的崩溃一致性。
函数 recover_from_log 首先调用函数 read_head 将磁盘中的 log header 读取到内存,然后调用函数 install_trans 根据 log header 将已 commit 的 block 写入到磁盘,最后清空内存中的 log header,并调用函数 write_head 清空磁盘中的 log header。kern/log.c
1
2
3
4
5
6
7
8
static void
具体来说,函数 read_head 先读取磁盘中的 log header,并将其复制到内存中的 log 结构里。kern/log.c
1
2
3
4
5
6
7
8
9
10
11
12
/*
* Read the log header from disk into the in-memory log header.
*/
static void
随后,函数 install_trans 根据 log header 中 block 的标号,将磁盘中已 commit 但还未写入到磁盘的 block 的内容复制到一个 buf 里,然后将它写入到磁盘。kern/log.c
1
2
3
4
5
6
7
8
9
10
11
12
13
14
15
/*
* Copy committed blocks from log to their home location.
*/
static void
最后,将内存中的 log header 清空,并调用函数 write_head 将其写入到磁盘,从而将磁盘中的 log header 也清空。kern/log.c
1
2
3
4
5
6
7
8
9
10
11
12
13
14
15
/*
* Write in-memory log header to disk.
* This is the true point at which the
* current transaction commits.
*/
static void
2.1.3.2 log_write
函数 log_write 的主要工作是在内存中的 log header 里记录需要被写入磁盘的 block 的标号,并标记这个 block 对应的 buf 为 dirty,以固定在 bcache 中,不会因 LRU 算法被意外淘汰。这些 block 将在之后被统一连续写入磁盘,从而提高效率。kern/log.c
1
2
3
4
5
6
7
8
9
10
11
12
13
14
15
16
17
18
19
20
21
22
23
24
25
26
27
28
29
30
/*
* Caller has modified b->data and is done with the buffer.
* Record the block number and pin in the cache with B_DIRTY.
* commit() / write_log() will do the disk write.
*
* log_write() replaces bwrite(); a typical use is:
* bp = bread(...)
* modify bp->data[]
* log_write(bp)
* brelse(bp)
*/
void
这里引入了 absorption 的优化机制。当在一个事务中多次写入同一个 block 时,在 log header 中仅记录一次这个 block 的标号,从而节省 log header 的空间,并提高效率。
2.1.3.3 begin_op
函数 begin_op 的主要工作是在事务开始前,等待 log 空闲(不处于正在 commit 的状态)且可用(log header 有足够的空间保存新的待写 block 的标号),然后才允许开始本次文件系统调用。kern/log.c
1
2
3
4
5
6
7
8
9
10
11
12
13
14
15
16
17
18
19
20
/*
* Called at the start of each FS system call.
*/
void
2.1.3.4 end_op
函数 end_op 的主要工作是在事务结束后,将 log header 中标记的 block 统一连续写入磁盘,并唤醒函数 begin_op 中等待 log 空闲且可用的文件系统调用。kern/log.c
1
2
3
4
5
6
7
8
9
10
11
12
13
14
15
16
17
18
19
20
21
22
23
24
25
26
27
28
29
30
/*
* Called at the end of each FS system call.
* Commits if this was the last outstanding operation.
*/
void
具体来说,先判断当前事务是否已结束(即 outstanding 的系统调用数量为 0)。如果是,则调用函数 commit 进行写磁盘操作。
函数 commit 首先调用函数 write_log 将待 commit 的 block 写入到磁盘中 log 对应的位置,接着调用函数 write_head 将内存中的 log header 写入到磁盘,然后调用函数 install_trans 根据 log header 将已 commit 的 block 写入到磁盘,最后清空内存中的 log header,并调用函数 write_head 清空磁盘中的 log header。kern/log.c
1
2
3
4
5
6
7
8
9
10
11
static void
具体来说,函数 write_log 根据 log header 中 block 的标号,将待 commit 的 block 写入到磁盘中 log 对应的位置。kern/log.c
1
2
3
4
5
6
7
8
9
10
11
12
13
14
15
/*
* Copy modified blocks from cache to log.
*/
static void
随后,函数 write_head 将内存中的 log header 写入到磁盘,此时事务被 commit。kern/log.c
1
2
3
4
5
6
7
8
9
10
11
12
13
14
15
/*
* Write in-memory log header to disk.
* This is the true point at which the
* current transaction commits.
*/
static void
之后的写磁盘过程同 initlog 节中函数 recover_from_log 的后半段。
2.1.4 Inode
第 4 层是索引节点(inode),包含了文件的元信息,用于描述文件系统对象。我们将在 kern/fs.c 中实现。
在这一层中,我们提供了以下方法:
iinit:初始化inode和icacheialloc:分配一个inodeiupdate:将内存中的inode写入到磁盘idup:将inode的引用数加1,其中引用数表示当前内存中指向这个inode的指针数量ilock:给inode加锁,需要时从磁盘中读取inodeiunlock:给inode解锁iput:当inode的引用数为1时,清空并释放该inode,否则将其引用数减1iunlockput:iunlock+iput的别名stati:复制inode的元数据到statreadi:从inode中读取数据writei:写入数据到inode
2.1.4.1 iinit
函数 iinit 的主要工作是初始化 icache 和 inode 的锁。kern/fs.c
1
2
3
4
5
6
7
8
9
10
11
12
13
14
void
其中,icache 的结构如下所示:kern/fs.c
1
2
3
4
icache;
inode 的结构如下所示: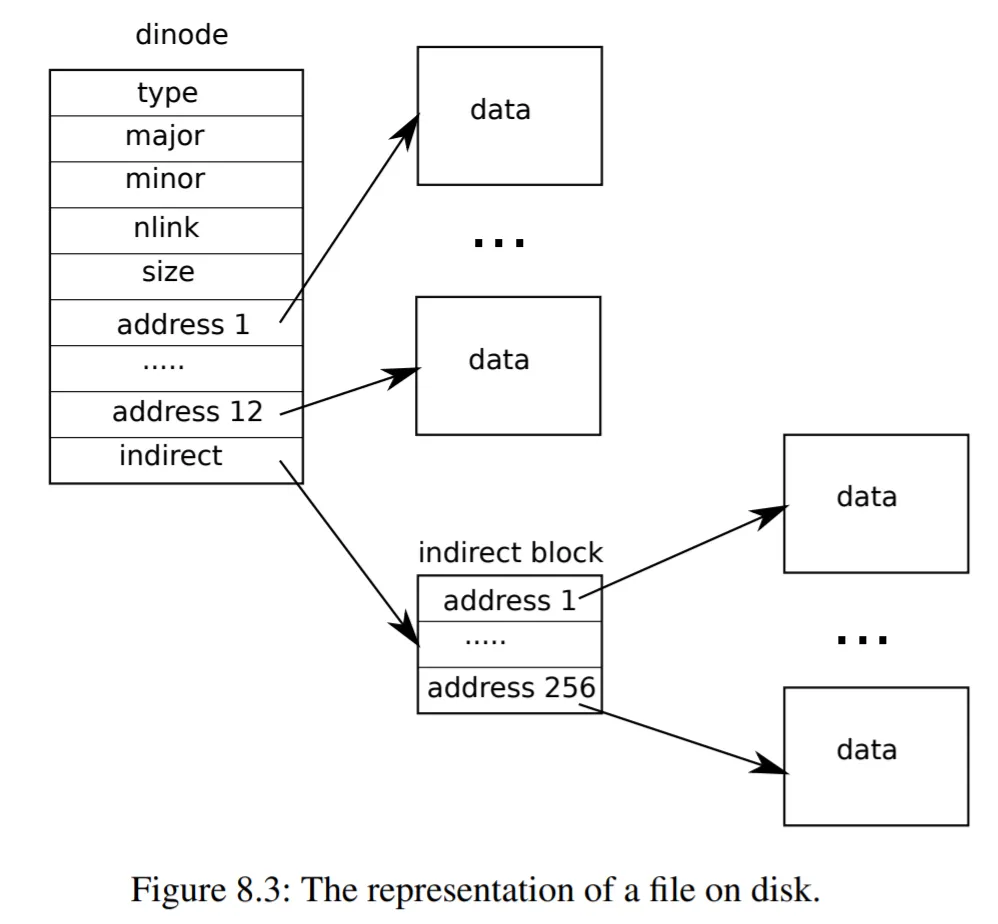
inc/file.h
1
2
3
4
5
6
7
8
9
10
11
12
13
14
15
16
17
/*
* In-memory copy of an inode.
*/
;
2.1.4.2 ialloc
函数 ialloc 的主要工作是在磁盘中找到一个未分配的 inode(type 为 0),然后将它的 type 设置为给定的文件类型,表示已分配,最后调用函数 iget,返回这个 inode 在内存中的拷贝。kern/fs.c
1
2
3
4
5
6
7
8
9
10
11
12
13
14
15
16
17
18
19
20
21
22
23
24
/*
* Allocate an inode on device dev.
*
* Mark it as allocated by giving it type type.
* Returns an unlocked but allocated and referenced inode.
*/
struct inode*
其中,函数 iget 先在 icache 中根据标号(inum)寻找对应的 inode。如果找到,则将其引用数(ref)加 1 并返回,否则在 icache 中回收一个空闲的 cache entry 给这个 inode,将其引用数(ref)设置为 1 并返回。kern/fs.c
1
2
3
4
5
6
7
8
9
10
11
12
13
14
15
16
17
18
19
20
21
22
23
24
25
26
27
28
29
30
31
32
33
/*
* Find the inode with number inum on device dev
* and return the in-memory copy. Does not lock
* the inode and does not read it from disk.
*/
static struct inode*
2.1.4.3 iupdate
函数 iupdate 的主要工作是将内存中的 inode 写入到磁盘。由于我们的 icache 采用直写(write-through)模式,因此每当 inode 有字段被修改,就需要调用一次函数 iupdate 进行写回操作。kern/fs.c
1
2
3
4
5
6
7
8
9
10
11
12
13
14
15
16
17
18
19
20
21
/*
* Copy a modified in-memory inode to disk.
*
* Must be called after every change to an ip->xxx field
* that lives on disk, since i-node cache is write-through.
* Caller must hold ip->lock.
*/
void
2.1.4.4 idup
函数 idup 的主要工作是将 inode 的引用数加 1,其中引用数表示当前内存中指向这个 inode 的指针数量。kern/fs.c
1
2
3
4
5
6
7
8
9
10
11
12
/*
* Increment reference count for ip.
* Returns ip to enable ip = idup(ip1) idiom.
*/
struct inode*
2.1.4.5 ilock
函数 ilock 的主要工作是给指定的 inode 加锁。如果当前 inode 不在内存中(即 valid 为 0),则从磁盘中读取,并将 valid 设置为 1。kern/fs.c
1
2
3
4
5
6
7
8
9
10
11
12
13
14
15
16
17
18
19
20
21
22
23
24
25
26
27
/*
* Lock the given inode.
* Reads the inode from disk if necessary.
*/
void
2.1.4.6 iunlock
函数 iunlock 的主要工作是给指定的 inode 解锁。kern/fs.c
1
2
3
4
5
6
7
8
9
10
/*
* Unlock the given inode.
*/
void
2.1.4.7 iput
函数 iput 的主要工作是当 inode 的引用数为 1 时,调用函数 itrunc 清空并释放该 inode 的内容,然后调用函数 iupdate 更新磁盘中的 inode。否则将其引用数减 1。kern/fs.c
1
2
3
4
5
6
7
8
9
10
11
12
13
14
15
16
17
18
19
20
21
22
23
24
25
26
27
28
29
30
31
32
33
/*
* Drop a reference to an in-memory inode.
*
* If that was the last reference, the inode cache entry can
* be recycled.
* If that was the last reference and the inode has no links
* to it, free the inode (and its content) on disk.
* All calls to iput() must be inside a transaction in
* case it has to free the inode.
*/
void
这里函数 itrunc 用于清空 inode 的内容,包括 NDIRECT 个直接索引磁盘块(direct block)和 NINDIRECT 个间接索引磁盘块(indirect block)。kern/fs.c
1
2
3
4
5
6
7
8
9
10
11
12
13
14
15
16
17
18
19
20
21
22
23
24
25
26
27
28
29
30
31
32
/*
* Truncate inode (discard contents).
*
* Only called when the inode has no links
* to it (no directory entries referring to it)
* and has no in-memory reference to it (is
* not an open file or current directory).
*/
static void
其中,函数 bfree 用于释放一个 block,将其在 bitmap 中标记为未使用。kern/fs.c
1
2
3
4
5
6
7
8
9
10
11
12
13
14
/*
* Free a disk block.
*/
static void
2.1.4.8 iunlockput
函数 iunlockput 是 iunlock + iput 的别名。kern/fs.c
1
2
3
4
5
6
7
8
9
/*
* Common idiom: unlock, then put.
*/
void
2.1.4.9 stati
函数 stati 的主要工作是复制 inode 的元数据(metadata)到 stat 结构,届时用户程序可以通过 stat 系统调用读取。kern/fs.c
1
2
3
4
5
6
7
8
9
10
11
12
13
14
15
16
17
18
19
20
/*
* Copy stat information from inode.
* Caller must hold ip->lock.
*/
void
2.1.4.10 readi
函数 readi 的主要工作是从 inode 中读取数据。具体来说,先确保数据的读取范围在文件内,然后利用函数 bmap 定位文件中 block 的地址并读取到 buf,接着将数据从 buf 复制到目标地址 dst,最后返回成功读取的 block 数量。kern/fs.c
1
2
3
4
5
6
7
8
9
10
11
12
13
14
15
16
17
18
19
20
21
22
23
24
/*
* Read data from inode.
* Caller must hold ip->lock.
*/
ssize_t
这里函数 bmap 根据 block 的标号找到其对应的地址并返回,其中 direct block 的地址位于数组 ip->addrs 中,indirect block 的地址位于 ip->addrs[NDIRECT] 指向的 block 所保存的数组中。如果发现找不到对应的 block,则调用函数 balloc 分配一个新的 block。kern/fs.c
1
2
3
4
5
6
7
8
9
10
11
12
13
14
15
16
17
18
19
20
21
22
23
24
25
26
27
28
29
30
31
32
33
34
35
36
37
38
39
/*
* Inode content
*
* The content (data) associated with each inode is stored
* in blocks on the disk. The first NDIRECT block numbers
* are listed in ip->addrs[]. The next NINDIRECT blocks are
* listed in block ip->addrs[NDIRECT].
*
* Return the disk block address of the nth block in inode ip.
* If there is no such block, bmap allocates one.
*/
static uint32_t
其中,函数 balloc 根据 block 在 bitmap 中所对应的位,遍历所有 block 找到一个可用的 block,将其在 bitmap 中标记为使用中,并调用函数 bzero 清空此 block。kern/fs.c
1
2
3
4
5
6
7
8
9
10
11
12
13
14
15
16
17
18
19
20
21
22
23
/*
* Allocate a zeroed disk block.
*/
static uint32_t
函数 bzero 用于清空一个 block。kern/fs.c
1
2
3
4
5
6
7
8
9
10
11
/*
* Zero a block.
*/
static void
2.1.4.11 writei
函数 writei 的主要工作是写入数据到 inode。具体来说,先确保数据的写入起始地址在文件内,且写入结束地址不超过最大文件大小 MAXFILE * BSIZE,然后利用函数 bmap 定位文件中 block 的地址并读取到 buf,接着将数据从源地址 src 复制到 buf,并调用函数 log_write 加入写磁盘队列,最后返回成功写入的 block 数量。其中,如果写入的 block 数量超过文件大小,文件将自动扩容,最后需要更新此文件的大小,并调用函数 iupdate 写入到磁盘。kern/fs.c
1
2
3
4
5
6
7
8
9
10
11
12
13
14
15
16
17
18
19
20
21
22
23
24
25
26
27
28
29
30
/*
* Write data to inode.
* Caller must hold ip->lock.
*/
ssize_t
2.1.5 Directory
第 5 层是目录,用于组织文件系统的层次结构(hierarchy)。TA 已在 kern/fs.c 中实现,由于时间有限,这里就不详细阐述了。
在这一层中,我们提供了以下方法:
namecmp:按字典序比较两个目录名的大小dirlookup:在一个目录下查找指定名称的文件夹dirlink:在一个目录下新建指定名称的文件夹
2.1.6 Pathname
第 6 层是路径,用于以字符串表示一个文件或文件夹在文件系统中的位置。TA 已在 kern/fs.c 中实现,由于时间有限,这里就不详细阐述了。
在这一层中,我们提供了以下方法:
namei:查找指定路径的文件或文件夹nameiparent:查找指定路径的父文件夹
2.1.7 File descriptor
第 7 层是文件描述符,以非负整数的形式,表示一个已打开文件(或管道、socket 等,一切皆文件!)的引用。内核为每个进程维护了一个进程级文件表(file table),同时在全局维护了一个系统级文件表(global file table,或 ftable),包含了所有打开的文件,文件描述符实际就是这个表的索引。我们将在 kern/file.c 中实现。由于时间有限,我们目前仅支持普通文件。
在这一层中,我们提供了以下方法:
file_init:初始化ftablefile_alloc:分配一个新文件file_dup:将文件的引用数加1file_close:将文件的引用数减1,当引用数降到0时关闭文件file_stat:读取文件的元数据file_read:从文件读取数据file_write:写入数据到文件
2.1.7.1 file_init
函数 file_init 的主要工作是初始化 ftable 的锁。kern/file.c
1
2
3
4
5
void
其中,ftable 的结构如下所示:kern/file.c
1
2
3
4
ftable;
file 的结构如下所示:inc/file.h
1
2
3
4
5
6
7
8
9
;
2.1.7.2 file_alloc
函数 file_alloc 的主要工作是在 ftable 中找到一个未使用的文件(ref 为 0),然后将它标记为使用中并返回。kern/file.c
1
2
3
4
5
6
7
8
9
10
11
12
13
14
15
16
17
/*
* Allocate a file structure.
*/
struct file*
2.1.7.3 file_dup
函数 file_dup 的主要工作是将文件的引用数加 1,表示创建一个此文件的引用拷贝。kern/file.c
1
2
3
4
5
6
7
8
9
10
11
12
/*
* Increment ref count for file f.
*/
struct file*
2.1.7.4 file_close
函数 file_close 的主要工作是将文件的引用数减 1,当引用数降到 0 时,对于普通文件,调用函数 iput 关闭文件。kern/file.c
1
2
3
4
5
6
7
8
9
10
11
12
13
14
15
16
17
18
19
20
21
22
23
24
25
26
/*
* Close file f. (Decrement ref count, close when reaches 0.)
*/
void
2.1.7.5 file_stat
函数 file_stat 的主要工作是调用函数 stati 读取文件的元数据。kern/file.c
1
2
3
4
5
6
7
8
9
10
11
12
13
14
/*
* Get metadata about file f.
*/
int
2.1.7.6 file_read
函数 file_read 的主要工作是对于普通文件,调用函数 readi 从文件中读取数据。kern/file.c
1
2
3
4
5
6
7
8
9
10
11
12
13
14
15
16
17
/*
* Read from file f.
*/
ssize_t
2.1.7.7 file_write
函数 file_write 的主要工作是对于普通文件,调用函数 writei 写入数据到文件。kern/file.c
1
2
3
4
5
6
7
8
9
10
11
12
13
14
15
16
17
18
19
20
21
22
23
24
25
26
27
28
29
30
31
32
33
34
35
/*
* Write to file f.
*/
ssize_t
2.2 系统调用
实验目标
请修改 syscall.c 以及 trapasm.S 来接上 musl,或者修改 Makefile 并搬运 xv6 的简易 libc,从而允许用户态程序通过调用系统调用来操作文件系统。
接上 musl 后,我们对系统调用的细节进行了一些修改。以下我们将以初始化程序 user/initcode.S 为例,简单梳理一下用户程序进行系统调用的全过程。
2.2.1 initcode.S
这里我们引入了 musl 的 syscall.h,其中包含了 libc 中所有系统调用所对应的 system call number 的定义,例如系统调用 sys_exec 对应的 system call number 就是 SYS_execve(其值为 221)。
对于 AArch64 架构来说,发起系统调用时,用户程序先将参数地址保存到通用寄存器 X0 ~ X5 里,再将系统调用对应的 system call number 保存到寄存器 X8 里,最后通过 svc 指令陷入内核态。1user/initcode.S
1
2
3
4
5
6
7
8
9
10
11
12
13
14
15
16
17
18
/* exec(init, argv) */
start:
    ldr     x0, =init
    ldr     x1, =argv
    mov     x8, #SYS_execve
    svc     0x00

/* char init[] = "/init\0"; */
init:
    .string "/init\0"

/* char *argv[] = { init, 0 }; */
.p2align 4
argv:
    .word init
    .word 0
    .word 0
    .word 0
2.2.2 trapasm.S
陷入内核态前,需要先构建 trap frame 结构。这里我们在原有寄存器的基础上,新增了 musl 需要用到的两个寄存器 Q0 和 TPIDR_EL0。kern/trapasm.S
1
2
3
4
/* Save Q0 and TPIDR_EL0 to placate musl. */
str q0, [sp, #-16]!
mrs x4, tpidr_el0
stp xzr, x4, [sp, #-16]!
其中,零寄存器 xzr 用于填充空位,以保持 16 bytes 对齐。
新的 trap frame 结构如下所示:inc/trap.h
1
2
3
4
5
6
7
8
9
10
11
12
13
14
15
16
17
18
19
20
21
22
23
24
25
26
27
28
29
30
31
32
33
34
35
36
37
38
39
40
41
42
43
44
;
2.2.3 trap.c
随后跳转到函数 trap 入口。在函数 trap 中,我们根据寄存器 ESR (Exception Syndrome Register) 判断当前为系统调用,随后调用函数 syscall1,传入 trap frame,并将返回值保存在 trap frame 的寄存器 X0 中。kern/trap.c
1
2
3
4
5
6
7
8
9
10
11
12
13
14
15
16
17
18
void
2.2.4 syscall.c
我们根据之前保存在寄存器 X8 的值,可以得到当前的 system call number。随后利用函数指针表 syscalls,即可进行相应的系统调用。kern/syscall.c
1
2
3
4
5
6
7
8
9
10
11
12
13
14
15
16
17
int
函数指针表 syscalls 包含了我们目前已实现的所有系统调用:inc/types.h
1typedef int ;
kern/syscall.c
1
2
3
4
5
6
7
8
9
10
11
12
13
14
15
16
17
18
19
20
21
22
23
24
static func syscalls =
;
由于时间有限,这些系统调用的功能和具体实现这里就不细讲了。函数定义的位置可以参见 syscall1.h 里的注释。inc/syscall1.h
1
2
3
4
5
6
7
8
9
10
11
12
13
14
15
16
17
18
19
20
21
22
23
24
25
26
27
28
// kern/syscall1.c
int ;
int ;
int ;
// kern/sysproc.c
int ;
int ;
size_t ;
int ;
int ;
int ;
// kern/sysfile.c
int ;
ssize_t ;
ssize_t ;
ssize_t ;
int ;
int ;
int ;
int ;
int ;
int ;
int ;
至此,用户程序就完成了一次系统调用。
2.3 Shell
实验目标
我们已经把 xv6 的 shell 搬运到了 user/src/sh 目录下,但需要实现 brk 系统调用来使用 malloc,你也可以自行实现一个简单的 shell。请在 user/src/cat 中实现 cat 命令并在你的 shell 中执行。
2.3.1 cat
我们引入了 3 个头文件,分别用于:
fcntl.h:打开和关闭文件,对应函数open和closestdio.h:输出文本到终端,对应函数printfunistd.h:各种系统调用,包括函数read,write,_exit
cat 命令的实质就是从一个文件读取数据,然后写入到另一个文件(默认为终端)。至于文件类型是管道、终端还是普通文件,我们并不关心,因为系统调用的底层已经针对不同的文件类型进行了相应的处理2。cat 命令的完整实现如下3:user/src/cat/main.c
1
2
3
4
5
6
7
8
9
10
11
12
13
14
15
16
17
18
19
20
21
22
23
24
25
26
27
28
29
30
31
32
33
34
35
36
37
38
char buf;
void
int
3 运行结果
遗憾的是,由于时间有限,代码虽然已全部完成(包括所有系统调用,以及函数 fork, wait, execve 等),但尚未调通。目前系统可以成功进行到初始化程序 initcode.S 完成系统调用,但暂时还不能启动 shell,故障原因仍在排查中。
有机会再继续做吧。 静态检查了源码,可以确认以下几处错误: 以上结论仅来自源码和调用约定的静态检查,没有重新编译或运行实验,也未确认修正这些问题后 shell 就能启动。保留原代码及当时的日志,供读者对照。GPT-6.1 Sol 注(2026-10-03)
X8,参数从 X0 开始,但 argint() 仍从 p->tf->x1 开始取参,应改为从 p->tf->x0 开始。这会使第一次 exec 把 argv 当作路径、把尚为零的 X2 当作 argv 地址,随后将地址 0 处的 initcode 指令误当作字符串指针,能够解释下方日志中的取参失败。评论区对此的指正是正确的。execve() 构造用户栈时,ustack[0] = argc 覆盖了刚保存的 argv[0]。此外,sys_exec() 传入的 envp 为 NULL,这里却以它为源地址复制 8 bytes,实际复制的是旧用户地址空间中地址 0 的内容。辅助向量 {0, AT_PAGESZ, PGSIZE, AT_NULL} 也以终止标记开头。按 musl 的 入口代码 和 libc 初始化代码,用户栈应依次保存 argc、完整的 argv 指针数组及其空指针、envp 指针数组及其空指针、成对的辅助向量及 {AT_NULL, 0},参数字符串另行存放。只修正取参寄存器,启动栈仍不符合 musl 的要求。trapret 恢复寄存器的顺序与压栈顺序不匹配,应先恢复填充位和 TPIDR_EL0,再恢复 Q0。当前实现会互换两个 16 bytes 的槽,破坏线程指针和 Q0。第一次进入 initcode 时相关槽均为零,会掩盖这个问题。uvm_alloc() 应从 ROUNDUP(oldsz, PGSIZE) 开始分配,当前实现会在旧大小未按页对齐时覆盖已有末页,并可能漏掉新增末页。uvm_copy() 和 uvm_unmap() 应将页表中的物理地址通过 P2V() 转为内核虚拟地址,当前却使用了 V2P(),分别影响 fork() 的页拷贝和内存释放。/init 启动后还要通过 fork() 创建子进程来执行 shell,因此这些也是需要继续修正的问题。Shell
1 &&
Plain Text
1
2
3
4
5
6
7
8
9
10
11
12
13
14
15
16
17
18
19
20
21
22
23
24
25
26
27
28
29
30
31
32
33
34
35
36
37
38
39
40
41
42
43
44
45
46
47
48
49
50
51
52
53
54
55
56
57
58
59
60
61
62
63
64
65
66
67
68
69
70
71
72
73
console_init: success.
main: [CPU 3] init started.
alloc_init: success.
proc_init: success.
irq_init: success.
timer_init: success at CPU 3.
file_init: success.
binit: success.
- mbox write: 0x7ccc8
- mbox read: 0x7ccc8
- clock rate: 50000000
- SD base clock rate from mailbox: 50000000
- Reset the card.
- Divisor selected = 104, shift count = 6
- EMMC: Set clock, status 0x1ff0000 CONTROL1: 0xe6807
- Send IX_GO_IDLE_STATE command.
- Send command response: 0
- EMMC: Sending ACMD41 SEND_OP_COND status 1ff0000
- Divisor selected = 2, shift count = 0
- EMMC: Set clock, status 0x1ff0000 CONTROL1: 0xe0207
- EMMC: SD Card Type 2 SC 128Mb UHS-I 0 mfr 170 'XY:QEMU!' r0.1 2/2006, #deadbeef RCA 4567
sd_init: Partition 1: 00 20 21 00 0c 49 01 08 00 08 00 00 00 00 02 00
- Status: 0
- CHS address of first absolute sector: head=32, sector=33, cylinder=0
- Partition type: 12
- CHS address of last absolute sector: head=73, sector=1, cylinder=8
- LBA of first absolute sector: 0x800
- Number of sectors: 131072
sd_init: Partition 2: 00 49 02 08 83 51 01 10 00 08 02 00 00 f8 01 00
- Status: 0
- CHS address of first absolute sector: head=73, sector=2, cylinder=8
- Partition type: 131
- CHS address of last absolute sector: head=81, sector=1, cylinder=16
- LBA of first absolute sector: 0x20800
- Number of sectors: 129024
sd_init: Partition 3: 00 00 00 00 00 00 00 00 00 00 00 00 00 00 00 00
- Status: 0
- CHS address of first absolute sector: head=0, sector=0, cylinder=0
- Partition type: 0
- CHS address of last absolute sector: head=0, sector=0, cylinder=0
- LBA of first absolute sector: 0x0
- Number of sectors: 0
sd_init: Partition 4: 00 00 00 00 00 00 00 00 00 00 00 00 00 00 00 00
- Status: 0
- CHS address of first absolute sector: head=0, sector=0, cylinder=0
- Partition type: 0
- CHS address of last absolute sector: head=0, sector=0, cylinder=0
- LBA of first absolute sector: 0x0
- Number of sectors: 0
sd_init: Boot signature: 55 aa
sd_init: success.
proc_alloc: proc 1 success.
user_init: proc 1 (initproc) success.
main: [CPU 3] init success.
main: [CPU 0] init started.
timer_init: success at CPU 0.
main: [CPU 2] init started.
timer_init: success at CPU 2.
main: [CPU 1] init started.
main: [CPU 0] init success.
main: [CPU 2] init success.
timer_init: success at CPU 1.
bget: dev 1 blockno 133121
main: [CPU 1] init success.
super block: size 1000 nblocks 941 ninodes 200 nlog 30 logstart 2 inodestart 32 bmapstart 58
iinit: success.
bget: dev 1 blockno 133121
bget: dev 1 blockno 133122
bget: dev 1 blockno 133122
initlog: success.
syscall: syscall 221 from proc 1
sys_exec: exec '' uargv 0
sys_exec: failed to fetch argument.
4 测试环境
- Ubuntu 18.04.5 LTS (WSL2 5.4.72)
- QEMU emulator 5.0.50
- GCC 8.4.0 (Target: aarch64-linux-gnu)
- GDB 8.2 (Target: aarch64-linux-gnu)
- GNU Make 4.1
5 参考资料
- xv6: a simple, Unix-like teaching operating system - MIT
- mit-pdos / xv6-public: xv6 OS - GitHub
- c - Syscall invoke in Aarch64 assembly - Stack Overflow
- arm - How to implement system call in ARM64? - Stack Overflow
不过本项目里仅支持普通文件,参见 File descriptor 节。 ↩︎