// inc/proc.h
structproc{structspinlocklock;// p->lock must be held when using these:
enumprocstatestate;// Process state
void*chan;// If non-zero, sleeping on chan
intkilled;// If non-zero, have been killed
intxstate;// Exit status to be returned to parent's wait
intpid;// Process ID
// wait_lock must be held when using these:
structproc*parent;// Parent process
// no lock needs to be held when using these:
char*kstack;// Bottom of kernel stack for this process
uint64_tsz;// Size of process memory (bytes)
uint64_t*pgdir;// Page table
structtrapframe*tf;// Trapframe for current syscall
structcontext*context;// swtch() here to run process
charname[16];// Process name (debugging)
};
// kern/proc.c
/*
* Initialize the spinlock for ptable to serialize the access to ptable
*/voidproc_init(){initlock(&wait_lock,"wait_lock");initlock(&pid_lock,"pid_lock");for(structproc*p=ptable.proc;p<&ptable.proc[NPROC];++p){initlock(&p->lock,"proc_lock");}cprintf("proc_init: success.\n");}
// kern/proc.c
/*
* Look through the process table for an UNUSED proc.
* If found, change state to EMBRYO and initialize
* state required to run in the kernel.
* Otherwise return 0.
*/staticstructproc*proc_alloc(){for(structproc*p=ptable.proc;p<&ptable.proc[NPROC];++p){acquire(&p->lock);if(p->state!=UNUSED){release(&p->lock);continue;}p->pid=pid_next();// Allocate kernel stack.
if(!(p->kstack=kalloc())){proc_free(p);release(&p->lock);returnNULL;}char*sp=p->kstack+KSTACKSIZE;// Leave room for trap frame.
sp-=sizeof(*p->tf);p->tf=(structtrapframe*)sp;// Set up new context to start executing at forkret.
sp-=sizeof(*p->context);p->context=(structcontext*)sp;memset(p->context,0,sizeof(*p->context));p->context->x30=(uint64_t)forkret;p->state=EMBRYO;cprintf("proc_alloc: proc %d success.\n",p->pid);returnp;}returnNULL;}
// kern/proc.c
/*
* Free a proc structure and the data hanging from it,
* including user pages.
* p->lock must be held.
*/staticvoidproc_free(structproc*p){p->chan=NULL;p->killed=0;p->xstate=0;p->pid=0;p->parent=NULL;if(p->kstack)kfree(p->kstack);p->kstack=NULL;p->sz=0;if(p->pgdir)vm_free(p->pgdir,4);p->pgdir=NULL;p->tf=NULL;p->name[0]='\0';p->state=UNUSED;}
// kern/proc.c
/*
* Set up first user process (only used once).
* Set trap frame for the new process to run
* from the beginning of the user process determined
* by uvm_init
*/voiduser_init(){externchar_binary_obj_user_initcode_start[];externchar_binary_obj_user_initcode_size[];structproc*p=proc_alloc();if(!p)panic("\tuser_init: process failed to allocate.\n");initproc=p;// Allocate a user page table.
if(!(p->pgdir=pgdir_init()))panic("\tuser_init: page table failed to allocate.\n");p->sz=PGSIZE;// Copy initcode into the page table.
uvm_init(p->pgdir,_binary_obj_user_initcode_start,(uint64_t)_binary_obj_user_initcode_size);// Set up trap frame to prepare for the first "return" from kernel to user.
memset(p->tf,0,sizeof(*p->tf));p->tf->x30=0;// initcode start address
p->tf->sp_el0=PGSIZE;// user stack pointer
p->tf->spsr_el1=0;// program status register
p->tf->elr_el1=0;// exception link register
strncpy(p->name,"initproc",sizeof(p->name));p->state=RUNNABLE;release(&p->lock);cprintf("user_init: proc %d (%s) success.\n",p->pid,p->name,cpuid());}
// kern/vm.c
/*
* Get a new page table.
*/uint64_t*pgdir_init(){uint64_t*pgdir;if(!(pgdir=(uint64_t*)kalloc()))returnNULL;memset(pgdir,0,PGSIZE);returnpgdir;}
// kern/vm.c
/*
* Load binary code into address 0 of pgdir.
* sz must be less than a page.
* The page table entry should be set with
* additional PTE_USER|PTE_RW|PTE_PAGE permission
*/voiduvm_init(uint64_t*pgdir,char*binary,uint64_tsz){char*mem;if(sz>=PGSIZE)panic("\tuvm_init: sz must be less than a page.\n");if(!(mem=kalloc()))panic("\tuvm_init: not enough memory.\n");memset(mem,0,PGSIZE);map_region(pgdir,(void*)0,PGSIZE,(uint64_t)mem,PTE_USER|PTE_RW|PTE_PAGE);memmove((void*)mem,(constvoid*)binary,sz);}
// kern/proc.c
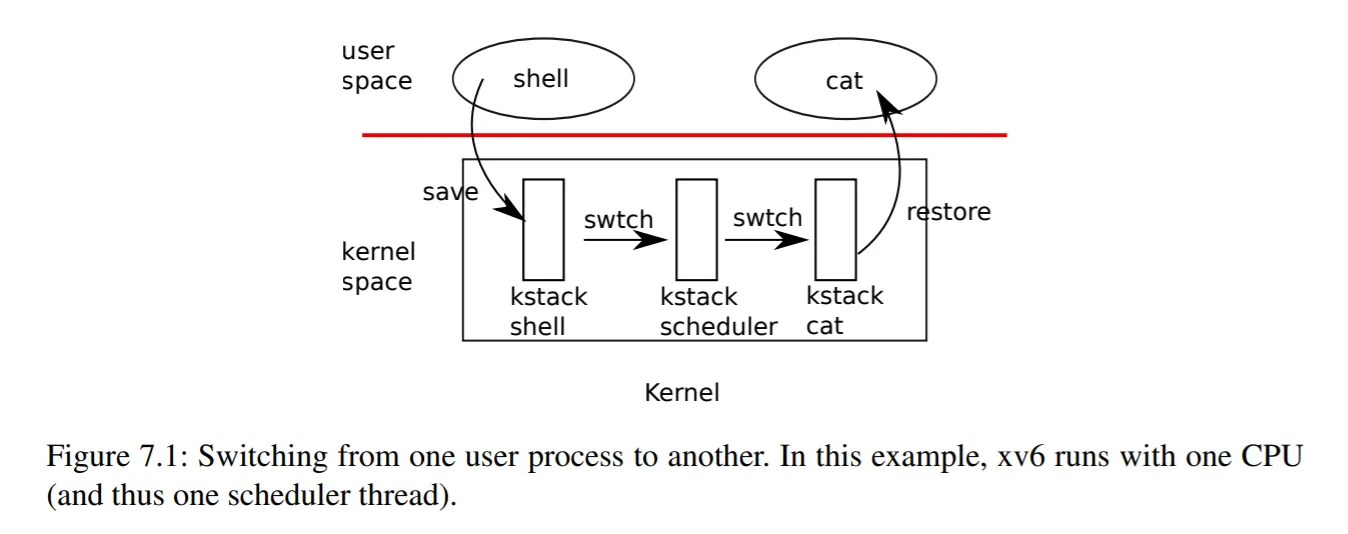
/*
* Per-CPU process scheduler
* Each CPU calls scheduler() after setting itself up.
* Scheduler never returns. It loops, doing:
* - choose a process to run
* - swtch to start running that process
* - eventually that process transfers control
* via swtch back to the scheduler.
*/voidscheduler(){structcpu*c=thiscpu;c->proc=NULL;while(1){// Loop over process table looking for process to run.
for(structproc*p=ptable.proc;p<&ptable.proc[NPROC];++p){acquire(&p->lock);if(p->state!=RUNNABLE){release(&p->lock);continue;}// Switch to chosen process. It is the process's job
// to release its lock and then reacquire it
// before jumping back to us.
c->proc=p;uvm_switch(p);p->state=RUNNING;cprintf("scheduler: switch to proc %d at CPU %d.\n",p->pid,cpuid());swtch(&c->scheduler,p->context);// Process is done running for now.
// It should have changed its p->state before coming back.
c->proc=NULL;release(&p->lock);}}}
// kern/vm.c
/*
* Switch to the process's own page table for execution of it.
*/voiduvm_switch(structproc*p){if(!p)panic("\tuvm_switch: no process.\n");if(!p->kstack)panic("\tuvm_switch: no kstack.\n");if(!p->pgdir)panic("\tuvm_switch: no pgdir.\n");lttbr0(V2P(p->pgdir));// Switch to process's address space
}
// kern/proc.c
/*
* A fork child's very first scheduling by scheduler()
* will swtch to forkret. "Return" to user space.
*/voidforkret(){structproc*p=thiscpu->proc;// Still holding p->lock from scheduler.
release(&p->lock);// Pass trap frame pointer as an argument when calling trapret.
usertrapret(p->tf);}
// https://github.com/mit-pdos/xv6-public/blob/master/proc.c
sp=p->kstack+KSTACKSIZE;// Leave room for trap frame.
sp-=sizeof*p->tf;p->tf=(structtrapframe*)sp;// Set up new context to start executing at forkret,
// which returns to trapret.
sp-=4;*(uint*)sp=(uint)trapret;sp-=sizeof*p->context;p->context=(structcontext*)sp;memset(p->context,0,sizeof*p->context);p->context->eip=(uint)forkret;
然而,ARM 架构下的函数返回机制与 x86 不同,是将寄存器 X30 的值作为返回地址,而没有这步弹栈操作。因此这个方案在 ARM 架构下不可行。
Xv6-riscv 的解决方案是,不采用 x86 下直接返回的方式,而是调用函数 usertrapret5。在 usertrapret 的最后,其实是调用了函数 userret,有点类似于我们的 trapret。
// https://github.com/mit-pdos/xv6-riscv/blob/riscv/kernel/trap.c
// jump to trampoline.S at the top of memory, which
// switches to the user page table, restores user registers,
// and switches to user mode with sret.
uint64fn=TRAMPOLINE+(userret-trampoline);((void(*)(uint64,uint64))fn)(TRAPFRAME,satp);
/* kern/trapasm.S *//* Help forkret to call trapret in an expected way. */.global usertrapret
usertrapret:/* Overlay stack pointer in trapret. */ mov sp, x0 b trapret
// kern/proc.c
/*
* Give up the CPU for one scheduling round.
*/voidyield(){structproc*p=thiscpu->proc;acquire(&p->lock);p->state=RUNNABLE;cprintf("yield: proc %d gives up CPU %d.\n",p->pid,cpuid());sched();release(&p->lock);}
// kern/proc.c
/*
* Enter scheduler. Must hold only p->lock
* and have changed p->state.
*/voidsched(){structcpu*c=thiscpu;structproc*p=c->proc;if(!holding(&p->lock))panic("\tsched: process not locked.\n");if(p->state==RUNNING)panic("\tsched: process running.\n");swtch(&p->context,c->scheduler);}
// kern/proc.c
/*
* Exit the current process. Does not return.
* An exited process remains in the zombie state
* until its parent calls wait() to find out it exited.
*/voidexit(intstatus){structproc*p=thiscpu->proc;// Temporarily disabled before user processes are implemented.
// if (p == initproc) panic("\texit: initproc exiting.\n");
acquire(&wait_lock);// Give any children to init.
reparent(p);acquire(&p->lock);p->xstate=status;p->state=ZOMBIE;release(&wait_lock);// Jump into the scheduler, never return.
sched();panic("\texit: zombie returned!\n");}
// kern/trap.c
voidtrap(structtrapframe*tf){structproc*p=thiscpu->proc;intsrc=get32(IRQ_SRC_CORE(cpuid()));intbad=0;if(src&IRQ_CNTPNSIRQ){timer(),timer_reset(),yield();}elseif(src&IRQ_TIMER){clock(),clock_reset();}elseif(src&IRQ_GPU){if(get32(IRQ_PENDING_1)&AUX_INT)uart_intr();elsebad=1;}else{switch(resr()>>EC_SHIFT){caseEC_SVC64:lesr(0);/* Clear esr. *//* Jump to syscall to handle the system call from user process */if(p->killed)exit(1);p->tf=tf;syscall();if(p->killed)exit(1);break;default:bad=1;}}if(bad)panic("\ttrap: unexpected irq.\n");}
函数 syscall 根据传入的第一个参数(即寄存器 X0 的值),也就是 system call number 决定跳转到哪个系统函数。这里我们仿照 xv6,采用了一个函数指针数组 syscalls 作为路由4。